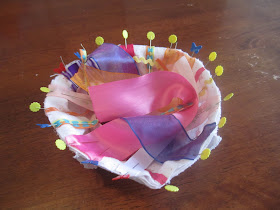
Chi loves ribbon. I have a couple of tag toys for her, but she is not convinced. She wants the loooong ribbon. So, I came up with this little jellyfish softie!
She loves it! She loves to munch on the long ribbon, and stare at the bright colors. It was definitely a win.
Do you want to make one too???
Materials: Scraps from my stash
LOTS of ribbon
Time: Two evenings, and one nap
I wanted the jellyfish to be a half circle, and remembered this amazing tutorial from Make it and Love it for a darling little turtle. Feel free to make a little turtle friend for your jellyfish! =)
I used those pattern pieces (found here -- just scroll down for the turtle pattern pieces, and cut out the "shell" and "base") to make the body of my jellyfish. I scaled mine down a little bit. My circle ended up being 6" in diameter. It's a great size for my little 6 month old.
Sew two of the triangles together along one side only. Repeat with other two triangles (as shown in the turtle tutorial). Sew the two half shells together. When I pinned the two sides together, I also pinned in a short piece of looped ribbon where all four pieces of the shell come together. This created a little tabby thing so I could hang the jellyfish up (like as a mobile). You can see the tab in the picture below. It should look a little like this:
You can see in the above picture, I cut out some long strips of fabric to make the wavy things at the base of the jellyfish. Oh, and I'm pretty sure "wavy thing" is the technical term. Ha!
The width of the strips are 2" from the top of the wave to the straight edge. The length of the strips will be the diameter of your circle times Pi plus 0.5" for seam allowance. So, since my diameter was 6", the length of my strips will be:
6" x 3.14159 = 18.85" + 0.5" = 19.35" total length.
Does that equation sound a little familiar? The circumference of a circle = PI*diameter. See? Math does come in handy sometimes! =)
Clip the hills and valleys every so often (make sure you don't clip through the seam!) to help it flip inside out more easily.
Open up the ends and pin right sides together (to form a ring).
Press the seam open, and fold right side out.
Now your seam is enclosed!
Now pin the wavy strips onto the shell, and add as much ribbon as you would like. The longest ribbon I cut was about 9" -- I didn't want this to be a strangulation hazard!
Sew 1/4" seam allowance around the shell. I added a zig-zag stitch for some extra reinforcement. Then I put an elastic around all my ribbon to gather it all together. I didn't want to accidentally sew the loose ends of the ribbon to the bottom!
Next pin on the bottom piece and sew around using a seam allowance slightly larger than a 1/4". Don't forget to leave an 1.5" gap so you can flip it right side out!
Add stuffing and sew the gap shut by hand. Voila! You have made a darling jellyfish!
I'm really tempted to make a few more and make a jellyfish mobile! It's pretty mesmerizing! =)


So cute! Is there anything you can't do!! I will love looking at all of your creations here and maybe one day copy some for me if I can ever find the time!!
ReplyDeleteSo, did you scale down the top of the "shell" also? If so, what mods did you make? Which sides are shorter? I like the size of yours. I don't want Huddy to get clobbered by a too-big jelly. :)
ReplyDeleteMeags -- Yes! I scaled down the shell too. What I did was copy the jpeg of the pattern and paste it into a word document. Then I decreased the size of the image until the base was about 6" in diameter (actually, when I pasted mine into the document, it was sized exactly how I wanted it). Then I printed out the document and cut out the shell and the body from the scaled down pattern. Does that make sense? If you want, I could just e-mail you my word document. Let me know!
DeleteAnd I'm so happy you are making one too! Please post pictures when you are done!
DeleteHow did you keep your ribbon ends from unraveling?
ReplyDeleteHey Michelle! I usually heat seal the ends by passing a cigarette lighter near the end of the ribbon. You could also buy Fray Check from your local craft store. Good luck!
DeleteYou’ve been featured at www.plushiepatterns.com! We love your tutorial. Feel free to submit any plushie or doll tutorials to be featured again.
ReplyDeleteThaanks for this
ReplyDelete